
Recently, I stumbled on an initiative “The Auror Project” by Sudarshan Pisupati which was starting a course called “3 Machine Labs”.
“3 Machine Labs” is a challenge based learning approach to solidify fundamentals of Active Directory over a series of 9 sessions.
The first session came with a challenge to automate the process of building an Active Directory Lab with some specifications.
Automation should:
- Setup two Virtual Machines; Windows Server & Windows 10
- Install Active Directory Domain Services(ADDS) on the Windows Server and promote the server to Domain controller through a process called DC Promo
- Add Windows 10 machine to Windows Server domain, through a process called Domain join
Some specifications for the machines were:
For Windows Server (Domain controller):
- Domain name should be “auror.local”
- Has DNS role
- Contains a Domain user called “Adam” with password “Pass@123”
For Windows 10:
- Should’ve Google Chrome installed
- User “Adam” should be configured as a local administrator
- Firewall should be disabled
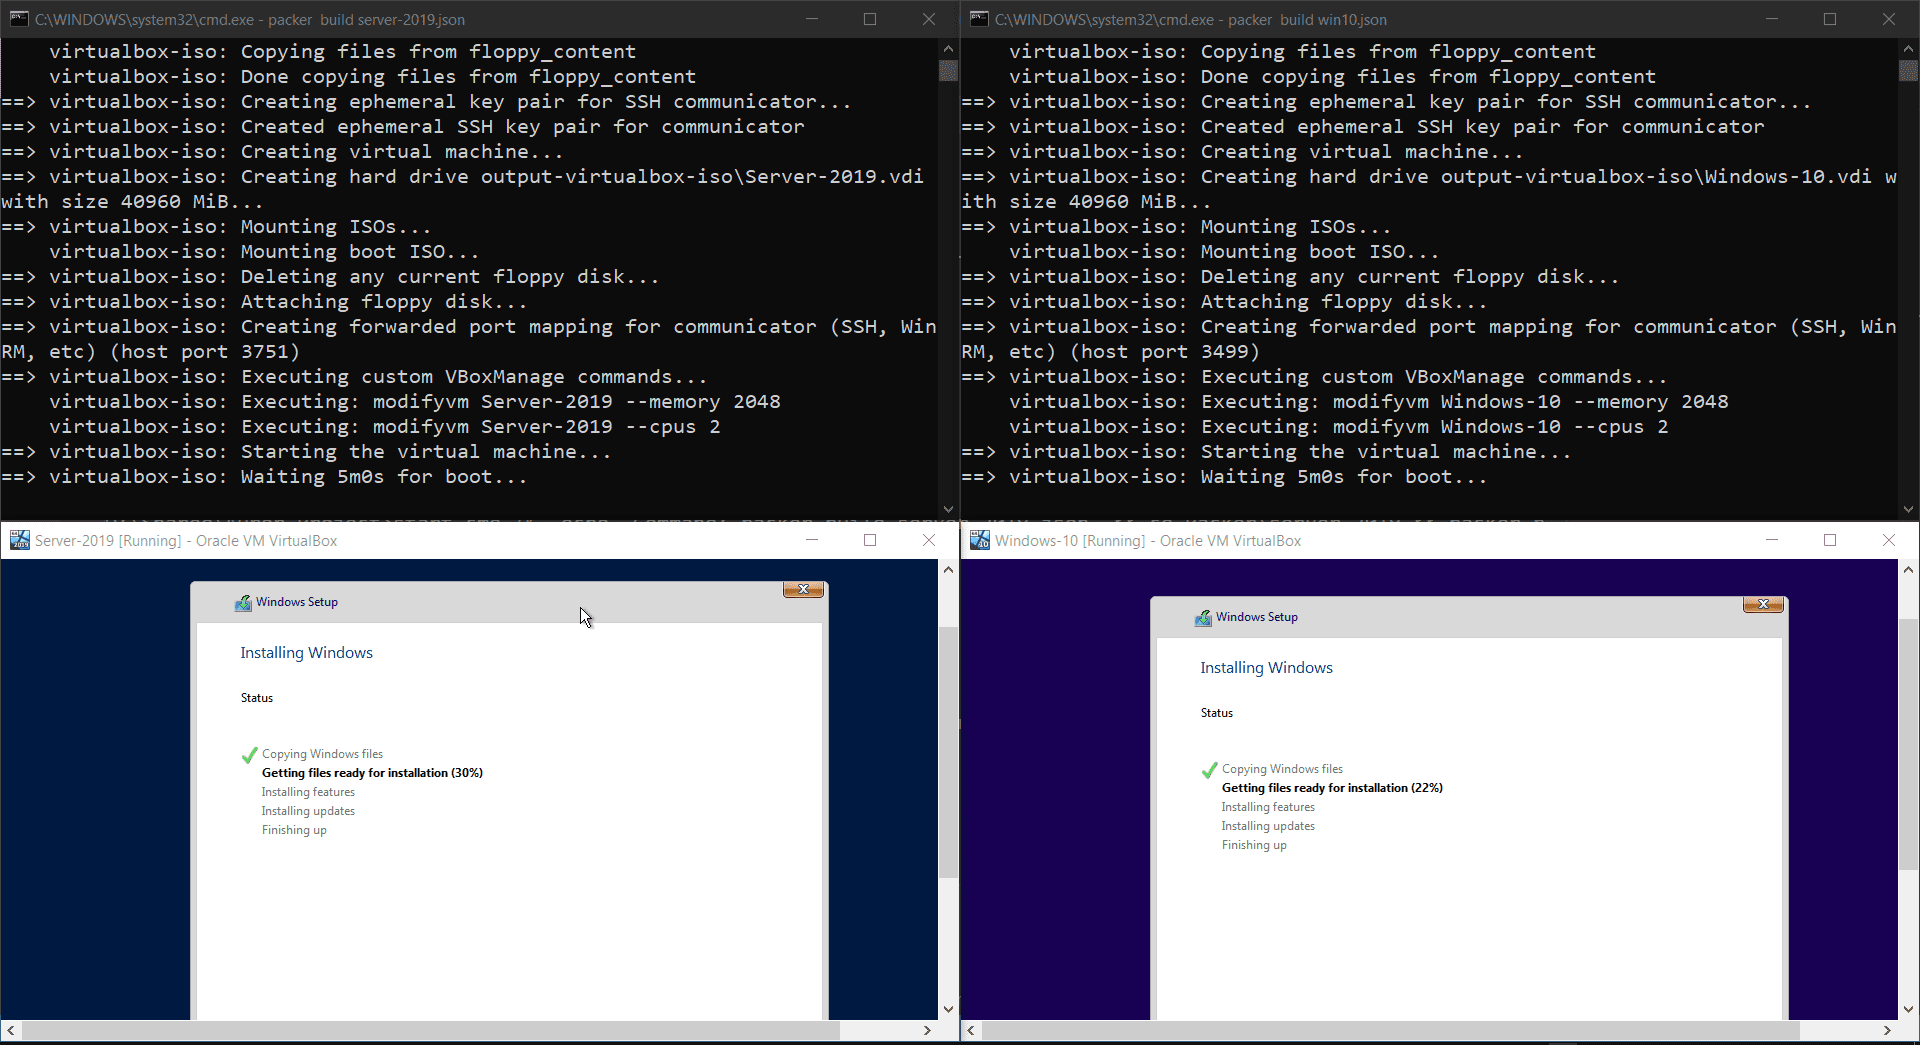
I gave a lot of time to this Task, for which I’m not sure on how should I feel like.. But..
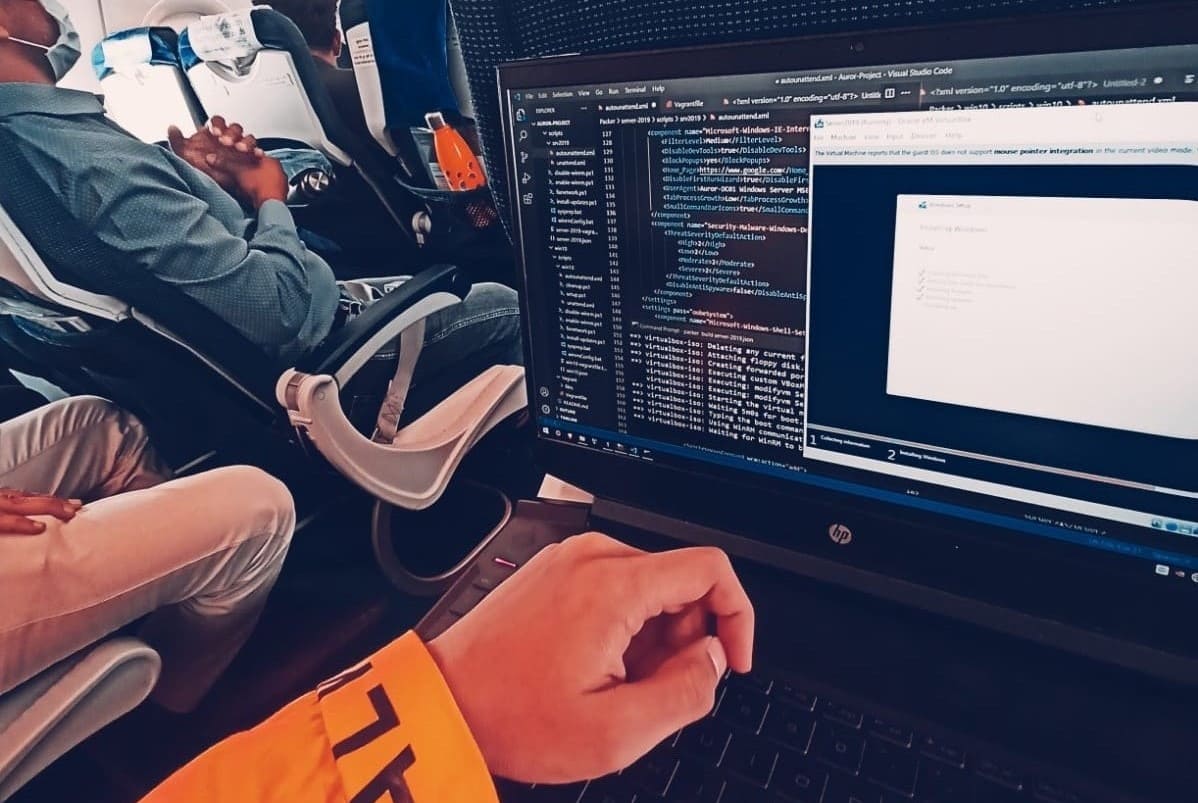
The pic above shows me running packer builds on my flight to Mumbai xD, hence a fair title for the blog “Automation on the Fly” :D
Mindmap
This session was already a catch for me. I’m a huge fan of automation but to my surprise I’d never given a thought of automating installations of virtual machines and lab environments, even though it was tedious, specially with AD environments.
Rebuilding an AD Lab manually means setup VMs , DC Promo, user and computer accounts and Domain join again, that too for a clean simplistic AD.
Sudarshan spoke about Clicks vs Time and How this automation needs to minimize clicks to bare minimum.
While snapshots and VM exports may seem like an easy way out for standalone machines, things get complicated in an Active Directory environment.
Snapshots break for AD because of “Time”.
- Domain Members (includes computers) have a maximum password age of 30 days. If reverted, password in AD and the computer may not match
- In AD, authentication works using Kerberos and Kerberos authentication uses time stamps as part of its protocol. Out of sync timestamps can result in missing tickets and even no authentication at all.
How to automate?
Question arises on how we can automate the whole process of VM installation from ISO files and configure those VMs according to our need.
There are a lot of alternatives and I’ve documented the automation using Packer and Vagrant with VirtualBox as my preferred choice of hypervisor, needless to say configuration files can be easily modified to any hypervisor of your choice.
- Packer is the first step which will create a base VM from the ISO.
- Vagrant will then further on build the whole virtual machine environment from the output of Packer by cloning and modifying/managing it.
What you’ll need?
- Packer or
choco install packer -yusing Chocolatey - Vagrant
- ISO file for Windows Server 2019
- ISO file for Windows 10
- Cloned Github repo
Note: You can even download the latest Windows Server 2019 and Windows 10 image from here and here but remember to modify
iso_urlandiso_checksumvariable in json files for Packer accordingly.
Packer
Packer needs a JSON file or HCL file as a template to configure the build here I’ve the files named server-2019.json and win10.json for both the machines.
This is the hierarchy for all the packer files needed for server-2019 and is similar for Windows 10 machine:
1
2
3
4
5
6
7
8
9
10
server-2019/
├── files
│   ├── autounattend.xml
│   ├── scripts
│   │   ├── fixnetwork.ps1
│   │   ├── sysprep.bat
│   │   └── winrmConfig.bat
│   └── unattend.xml
├── server-2019.json
└── server-2019-vagrantfile.template
I’ve used JSON template files which contains all the necessary configuration like Type of installation(ISO here), Disk size, No. of CPUs, Memory size, OS type, ISO url/path, communicator type for vagrant(WinRM here) with it’s credentials, files which need to be mounted for use and finally the post processors(vagrant) for it’s output.
External scripts in packer
As you can see there are 3 common external scripts I have used with packer in my git repo, namely fixnetwork.ps1, winrmConfig.bat and sysprep.bat.
winrmConfig.bat:
Communicators are used by Packer to upload files, execute scripts, etc. with the machine being created.winrmConfig.batis a pre-run script that configures and enables WinRM on the guest machine.All the configuration and code for the script has been given in Packer docs:www.packer.io/docs/communicators/winrm
fixnetwork.ps1:
If you try to run the abovewinrmConfig.batin windows10, it’ll not work because on a Server OS, like Windows Server 2019, the firewall rule for Public networks allows on remote connections from other devices on the same network. On a client OS, like Windows 10, you will receive an error stating that you are a public network.Here’s an article which goes in detail for WinRM configuration and how networks should be managed: adamtheautomator.com/enable-psremoting
sysprep.bat:
Before you can deploy a Windows image to new PCs, you have to first generalize the image. Generalizing the image removes computer-specific information such as installed drivers and the computer security identifier (SID).The
sysprep /generalizecommand removes unique information from your Windows installation so that you can safely reuse that image on a different computer. The next time that you boot the Windows image, the specialize configuration pass runs.I’ve used
unattend.xmlanswer file with sysprep to generalize my image.You can see the GUI execution of SysPrep here to get more context.
References: SysPrep using unattend, SysPrep Command line options
There are two more scripts: cleanup.ps1 and setup.ps1 used with Windows 10 machine to fiddle with thing like: Windows Updates, Temporary files, password expiration for administrator, Disabling sleep, hibernation and configuring Powershell prompt to show time.
Vagrant
Vagrant uses Vagrantfile containing the configuration to make the environment for the virtual machine.
Here’s the hierarchy of the vagrant files needed for building the whole lab from the output of Packer which is server-2019.box and win10.box.
1
2
3
4
5
6
7
8
9
10
11
Vagrant/
├── files
│   ├── add-adam.ps1
│   ├── add-localadmin.ps1
│   ├── install-active-directory.ps1
│   ├── install-chrome.ps1
│   ├── join-domain.ps1
│   └── set-timezone.ps1
├── server-2019.box
├── Vagrantfile
└── win10.box
Vagrantfileprovides hostname for the machines, their network configuration and uses the WinRM credentials(configured in Packer) to communicate with the guest and run scripts. It even handles VirtualBox configuration for the name, memory(including video memory), guest additions like shared clipboard etc.
Note: Be careful on the network adapter configuration, I’ve kept 10.1.1.0/24 as subnet, which shouldn’t collide with the other having 10.0.2.0/24
(I was trying to keep the original network given to us: 10.0.0.0/24, where DC01 had the IP 10.0.0.9. But, If I mention the gateway as 10.0.0.0, it would collide with the first adapter, by giving the second adapter the subnet of 10.0.0.0/8)
Scripts used: For DC01:
set-timezone.ps1- Sets timezone for DC01install-active-directory.ps1- Install ADDS and perform DCPromo, create a new forest which contains a domain namedauror.localadd-adam.ps1- Adds a user namedAdamFor PC01:install-chrome.ps1- Installs chrome, disables firewall and enables RDP for PC01join-domain.ps1- Performs Domain Join process usingAdd-Computer, by first setting the DNS as DC01add-localadmin.ps1- SetsAdamas local administrator for PC01, Runs windows update and disables windows defender automatic submissions
What a waste of time…
Since, I’d no clue what Packer and Vagrant is before this project, this section will go in an in-depth explanation on how everything works using Packer and Vagrant.
You don’t necessarily have to read this and can go to TL;DR Build the lab?
First, Packer will be used to build the base VM from the ISOs.
Explaining Packer files
I discussed about the template JSON file, but what about others?
server-2019-vagrantfile.templateis used in thepost_processorssection as this template file will be needed to output the build in.boxformat for Vagrant.autounattend.xmlis the core answer file for automating the whole windows installation processunattend.xmlis another answer file which is used to modify windows settings after the first user is created and assigned a default language(We’ll need that with SysPrep)- Scripts folder contains various scripts already discussed
What is autounattend.xml?
The most important file for Packer is autounattend.xml, it acts as an answer file to Windows Setup installation since all the UI pages needs to be automated. Unattended installation settings can be applied in one or more configuration passes.
But What are Windows setup configuration passes?
Windows Setup Configuration Passes are used to specify different phases of Windows Setup. Source: Windows-Setup-Configuration-Passes
The following diagram shows the relationship between the configuration passes relative to the different deployment tools.
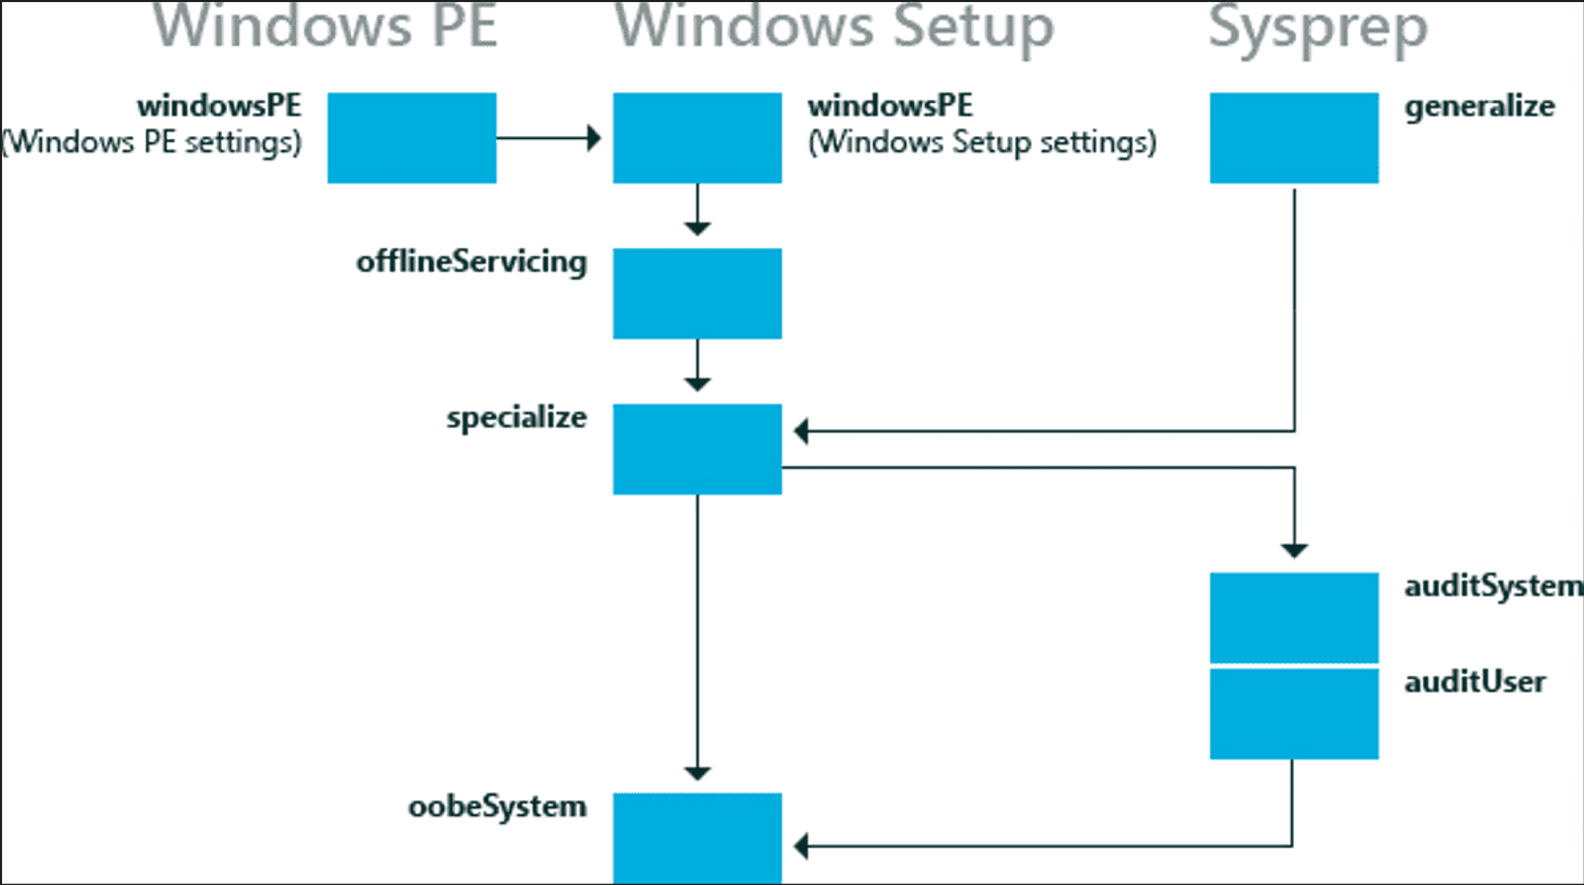
Not all configuration passes run in a particular installation of Windows. Some configuration passes, such as auditSystem and auditUser, run only if you boot the computer to audit mode.
Most Windows Setup unattend settings can be added to either the specialize or the oobeSystem configuration pass. The other configuration passes can also be useful in certain situations.
windowsPE Configuration pass
The windowsPE configuration pass is used to configure settings specific to Windows Preinstallation Environment (Windows PE) in addition to settings that apply to installation.
This configuration pass runs when booting the Windows Setup media.
For more info: Microsoft-WindowsPE
As already stated, windowsPE configures settings related to the installation environment and then the setup as well. So, it usually has 2 components Microsoft-Windows-International-Core-WinPE and Microsoft-Windows-Setup.
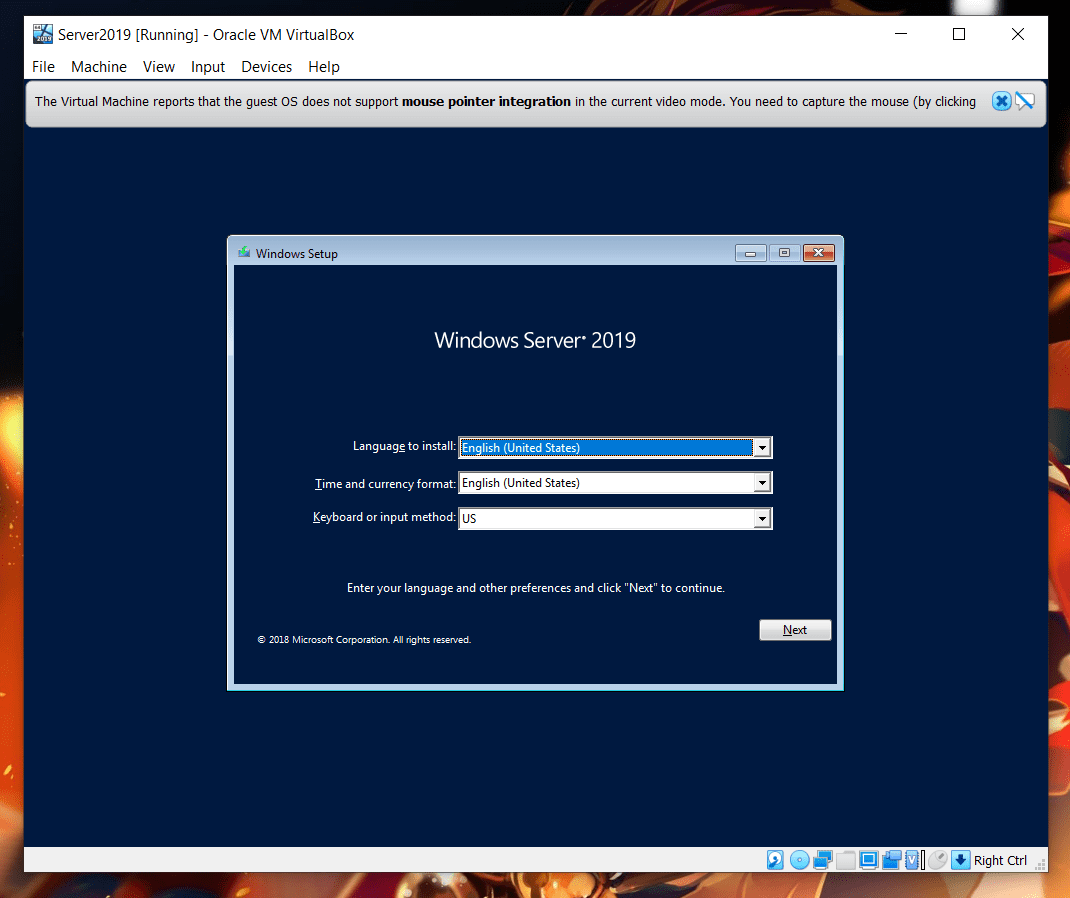
Component Microsoft-Windows-International-Core-WinPE
It specifies the default language, locale, and other international settings to use during Windows Setup or Windows Deployment Services installations.
So, The first screen, which is the language selection screen is now automated.
The code snippet looks something like this:
1
2
3
4
5
6
7
8
9
10
        <component name="Microsoft-Windows-International-Core-WinPE" processorArchitecture="amd64" publicKeyToken="31bf3856ad364e35" language="neutral" versionScope="nonSxS" xmlns:wcm="http://schemas.microsoft.com/WMIConfig/2002/State" xmlns:xsi="http://www.w3.org/2001/XMLSchema-instance">
            <SetupUILanguage>
                <UILanguage>en-US</UILanguage>
            </SetupUILanguage>
            <InputLocale>en-US</InputLocale>
            <SystemLocale>en-US</SystemLocale>
            <UILanguage>en-US</UILanguage>
            <UILanguageFallback>en-US</UILanguageFallback>
            <UserLocale>en-US</UserLocale>
        </component>
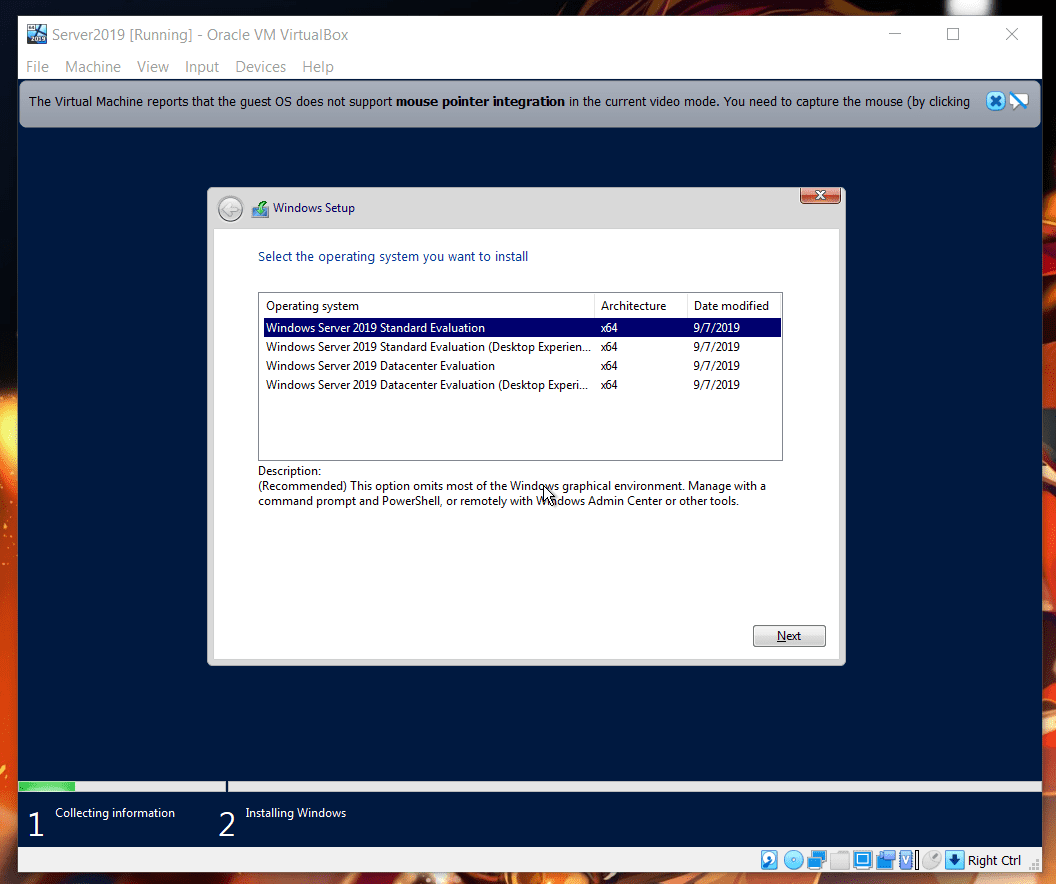
Component Microsoft-Windows-Setup
This component contains settings that enable you to select the Windows image that you install, configure the disk that you install Windows to, and configure the Windows PE operating system.
- Imageinstall
1
2
3
4
5
6
7
8
9
10
11
12
13
14
         <ImageInstall>
             <OSImage>
                 <InstallFrom>
                     <MetaData wcm:action="add">
                         <Key>/IMAGE/NAME</Key>
                         <Value>Windows Server 2019 SERVERSTANDARD</Value>
                     </MetaData>
                 </InstallFrom>
                 <InstallTo>
                     <DiskID>0</DiskID>
                     <PartitionID>2</PartitionID>
                 </InstallTo>
             </OSImage>
         </ImageInstall>

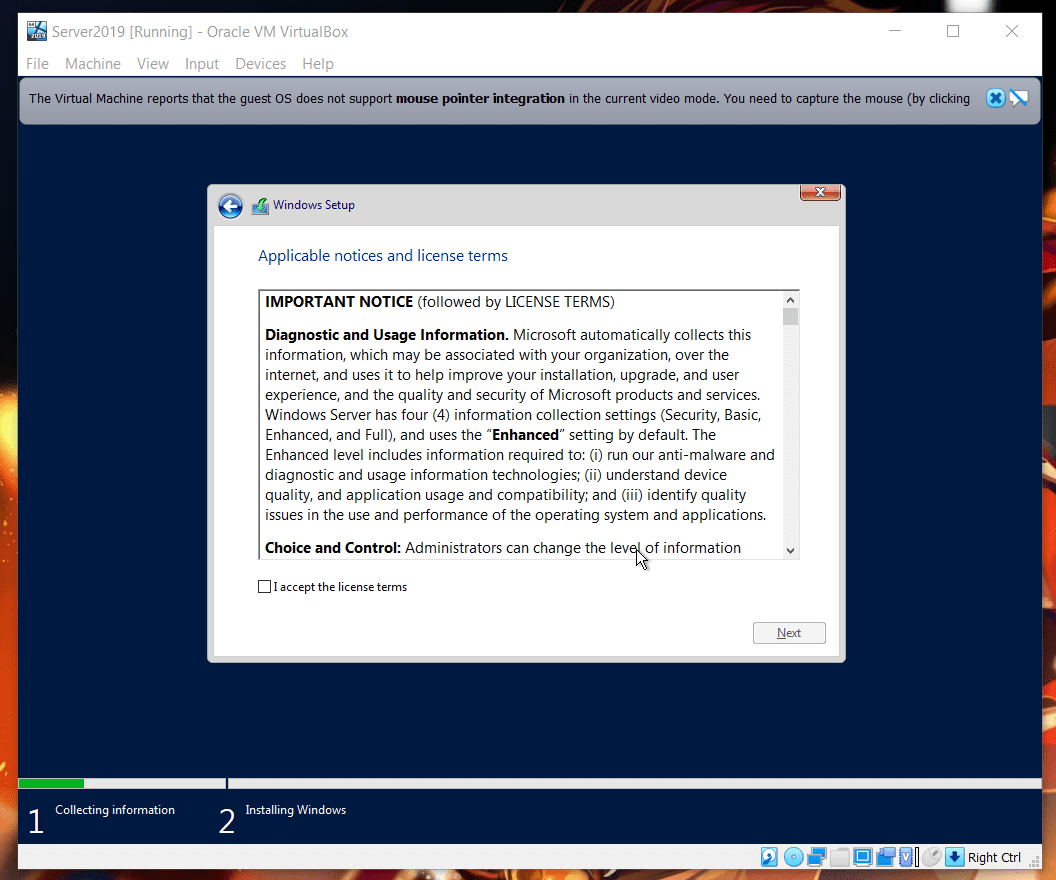
- Now we’re greeted with EULA agreement message: and that is handled by:
1
2
3
4
5
         <UserData>
             <AcceptEula>true</AcceptEula>
             <FullName>Packer</FullName>
             <Organization>Packer</Organization>
         </UserData>
- Disk configuration: This configuration creates 2 partitions:
- boot partition of 350MB in size
- Rest size extended for C Drive
1
2
3
4
5
6
7
8
9
10
11
12
13
14
15
16
17
18
19
20
21
22
23
24
25
26
27
28
29
30
31
32
33
34
       <DiskConfiguration>
           <Disk wcm:action="add">
               <CreatePartitions>
                   <CreatePartition wcm:action="add">
                       <Type>Primary</Type>
                       <Order>1</Order>
                       <Size>350</Size>
                   </CreatePartition>
                   <CreatePartition wcm:action="add">
                       <Order>2</Order>
                       <Type>Primary</Type>
                       <Extend>true</Extend>
                   </CreatePartition>
               </CreatePartitions>
               <ModifyPartitions>
                   <ModifyPartition wcm:action="add">
                       <Active>true</Active>
                       <Format>NTFS</Format>
                       <Label>boot</Label>
                       <Order>1</Order>
                       <PartitionID>1</PartitionID>
                   </ModifyPartition>
                   <ModifyPartition wcm:action="add">
                       <Format>NTFS</Format>
                       <Label>Local Disk</Label>
                       <Letter>C</Letter>
                       <Order>2</Order>
                       <PartitionID>2</PartitionID>
                   </ModifyPartition>
               </ModifyPartitions>
               <DiskID>0</DiskID>
               <WillWipeDisk>true</WillWipeDisk>
           </Disk>
       </DiskConfiguration>
 and that is handled by:
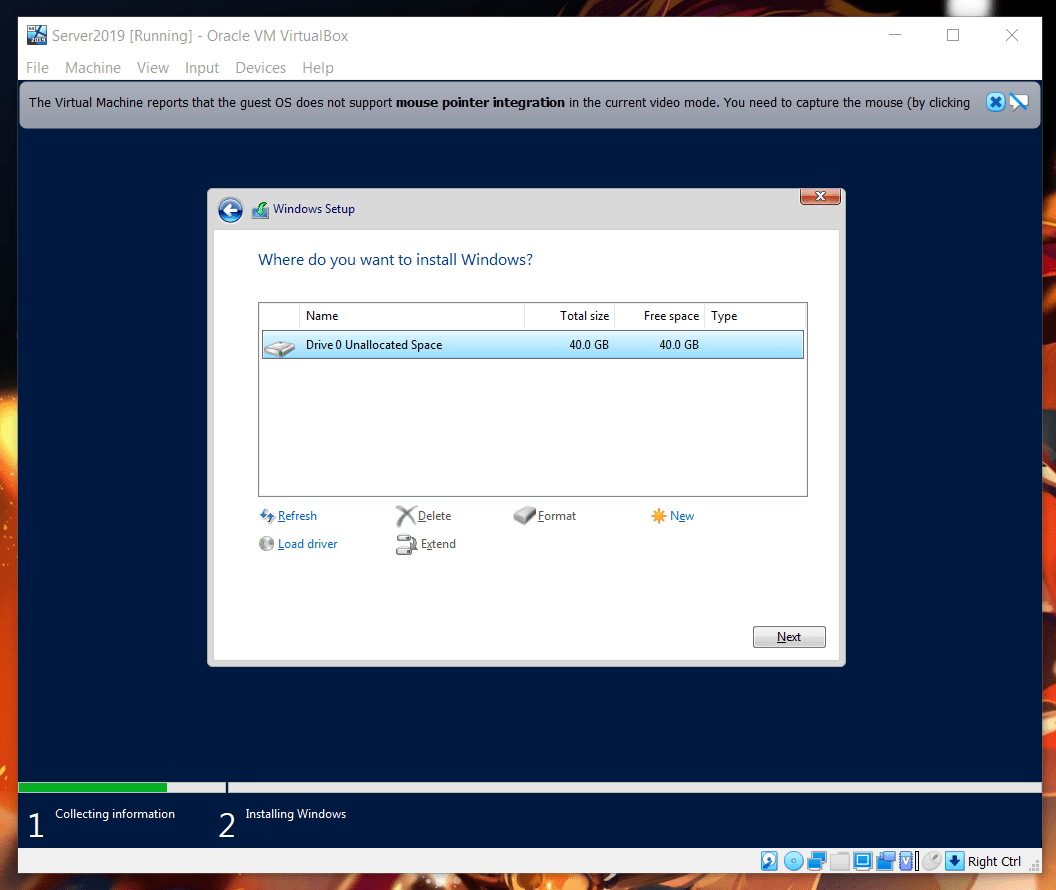
offlineServicing Configuration pass
offlineServicing configuration pass to apply unattended Setup settings to an offline Microsoft Windows image. During this configuration pass, you can add language packs, update package, device drivers, or other packages to the offline image.
The Microsoft-Windows-LUA-Settings component includes settings related to the Windows User Account Controls (UAC), formerly known as Limited User Account (LUA).
1
2
3
4
5
    <settings pass="offlineServicing">
        <component name="Microsoft-Windows-LUA-Settings" processorArchitecture="amd64" publicKeyToken="31bf3856ad364e35" language="neutral" versionScope="nonSxS" xmlns:wcm="http://schemas.microsoft.com/WMIConfig/2002/State" xmlns:xsi="http://www.w3.org/2001/XMLSchema-instance">
            <EnableLUA>false</EnableLUA>
        </component>
    </settings>
EnableLUA specifies whether the windows User Account Controls (UAC) should notify the user when programs try to make changes to the computer.
We set that to false, so that UAC prompts aren’t popped up.
specialize Configuration pass
During the specialize configuration pass of Windows Setup, computer-specific information for the image is applied.
For example you can:
- configure network settings, timezone settings, and domain information.
1
2
3
4
5
6
7
8
9
  <settings pass="specialize">
      <component name="Microsoft-Windows-Shell-Setup" processorArchitecture="amd64" publicKeyToken="31bf3856ad364e35" language="neutral" versionScope="nonSxS" xmlns:wcm="http://schemas.microsoft.com/WMIConfig/2002/State" xmlns:xsi="http://www.w3.org/2001/XMLSchema-instance">
          <OEMInformation>
              <HelpCustomized>false</HelpCustomized>
          </OEMInformation>
          <ComputerName>Server-2019</ComputerName>
          <TimeZone>India Standard Time</TimeZone>
          <RegisteredOwner/>
      </component>
- Computer specific configuration like not opening Server Manager whenever a user logs on
1
2
3
      <component name="Microsoft-Windows-ServerManager-SvrMgrNc" processorArchitecture="amd64" publicKeyToken="31bf3856ad364e35" language="neutral" versionScope="nonSxS" xmlns:wcm="http://schemas.microsoft.com/WMIConfig/2002/State" xmlns:xsi="http://www.w3.org/2001/XMLSchema-instance">
          <DoNotOpenServerManagerAtLogon>true</DoNotOpenServerManagerAtLogon>
      </component>
- and Setting Global execution policy of 64/32-Bit to be Remotely signed using
RunSynchronousCommand1 2 3 4 5 6 7 8 9 10 11 12 13 14 15
<component name="Microsoft-Windows-Deployment" processorArchitecture="amd64" publicKeyToken="31bf3856ad364e35" language="neutral" versionScope="nonSxS" xmlns:wcm="http://schemas.microsoft.com/WMIConfig/2002/State" xmlns:xsi="http://www.w3.org/2001/XMLSchema-instance"> <RunSynchronous> <RunSynchronousCommand wcm:action="add"> <Order>1</Order> <Description>Set Execution Policy 64 Bit</Description> <Path>cmd.exe /c powershell -Command "Set-ExecutionPolicy -ExecutionPolicy RemoteSigned -Force"</Path> </RunSynchronousCommand> <RunSynchronousCommand wcm:action="add"> <Order>2</Order> <Description>Set Execution Policy 32 Bit</Description> <Path>cmd.exe /c powershell -Command "Set-ExecutionPolicy -ExecutionPolicy RemoteSigned -Force"</Path> </RunSynchronousCommand> </RunSynchronous> </component> </settings>
oobSystem Configuration pass
The oobeSystem configuration pass, also known as Windows Welcome, can be used to preconfigure user interface pages for an end user.
Like this built-in administrator account can be automated by oobsystem as: 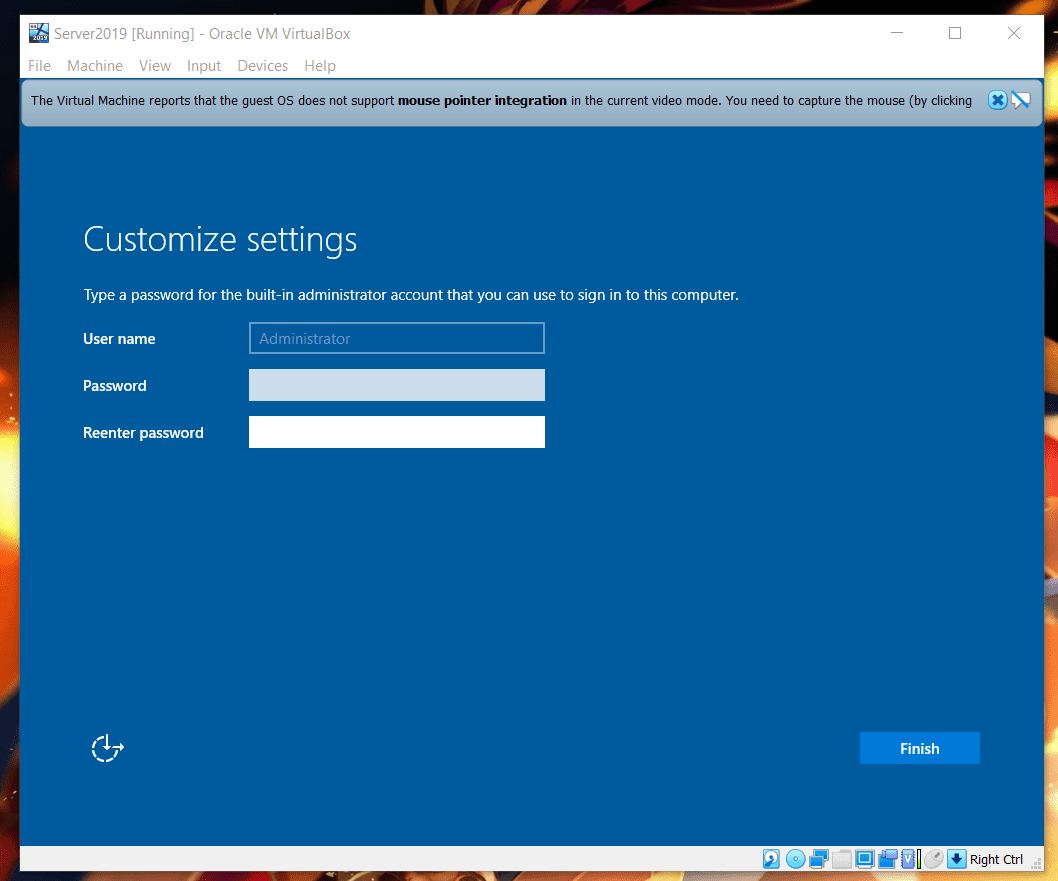
1
2
3
4
5
6
7
8
9
10
11
12
13
14
15
16
17
18
            <UserAccounts>
                <AdministratorPassword>
                    <Value>vagrant</Value>
                    <PlainText>true</PlainText>
                </AdministratorPassword>
                <LocalAccounts>
                    <LocalAccount wcm:action="add">
                        <Password>
                            <Value>vagrant</Value>
                            <PlainText>true</PlainText>
                        </Password>
                        <Group>administrators</Group>
                        <DisplayName>Vagrant</DisplayName>
                        <Name>vagrant</Name>
                        <Description>Vagrant User</Description>
                    </LocalAccount>
                </LocalAccounts>
            </UserAccounts>
Then using these credentials we can even configure the user-specific configurations as:
- Autologon Specifies credentials for an account that is used to automatically log on to the computer.
1
2
3
4
5
6
7
8
          <AutoLogon>
              <Password>
                  <Value>vagrant</Value>
                  <PlainText>true</PlainText>
              </Password>
              <Enabled>true</Enabled>
              <Username>vagrant</Username>
          </AutoLogon>
- FirstLogonCommands Specifies commands to run the first time that an end user logs on to the computer.
1
2
3
4
5
6
7
          <FirstLogonCommands>
              <SynchronousCommand wcm:action="add">
                  <CommandLine>cmd.exe /c powershell -Command "Set-ExecutionPolicy -ExecutionPolicy RemoteSigned -Force"</CommandLine>
                  <Description>Set Execution Policy 64 Bit</Description>
                  <Order>1</Order>
                  <RequiresUserInput>true</RequiresUserInput>
              </SynchronousCommand>
- OOBE OOBE specifies the behavior of some of the Windows Out of Box Experience (OOBE) screens.
1
2
3
4
5
6
7
8
9
          <OOBE>
              <HideEULAPage>true</HideEULAPage>
              <HideLocalAccountScreen>true</HideLocalAccountScreen>
              <HideOEMRegistrationScreen>true</HideOEMRegistrationScreen>
              <HideOnlineAccountScreens>true</HideOnlineAccountScreens>
              <HideWirelessSetupInOOBE>true</HideWirelessSetupInOOBE>
              <NetworkLocation>Home</NetworkLocation>
              <ProtectYourPC>1</ProtectYourPC>
          </OOBE>
Click, Click .. Windows ADK
So, I spent so long in understanding what all the components and functions do, that I accidently stumbled onto Windows ADK and felt like a complete loser.
Now, talking about how you don’t have to write answer xml files yourselves, rather generate it using Windows Assessment and Deployment Kit(ADK).
Install Windows ADK and..
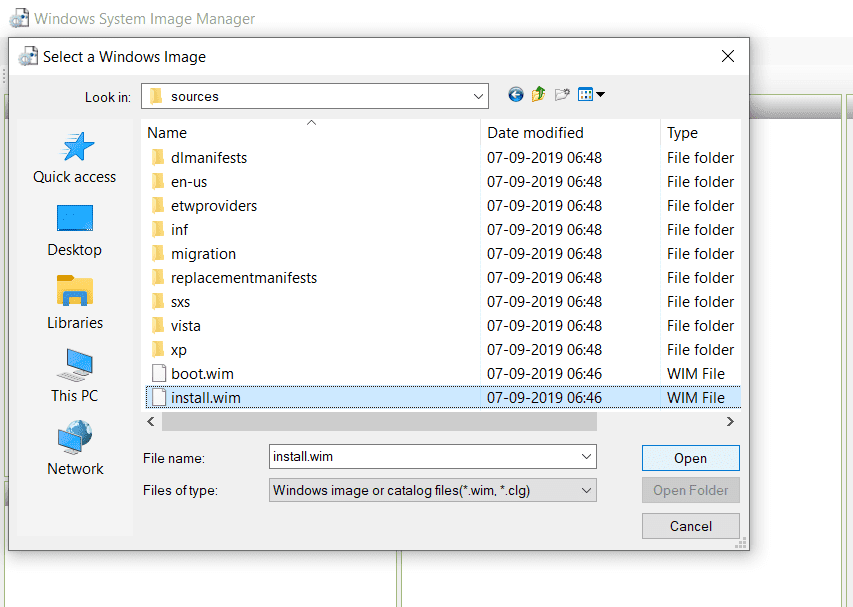
- Click on File -> Create answer file -> Click yes, to open Windows image
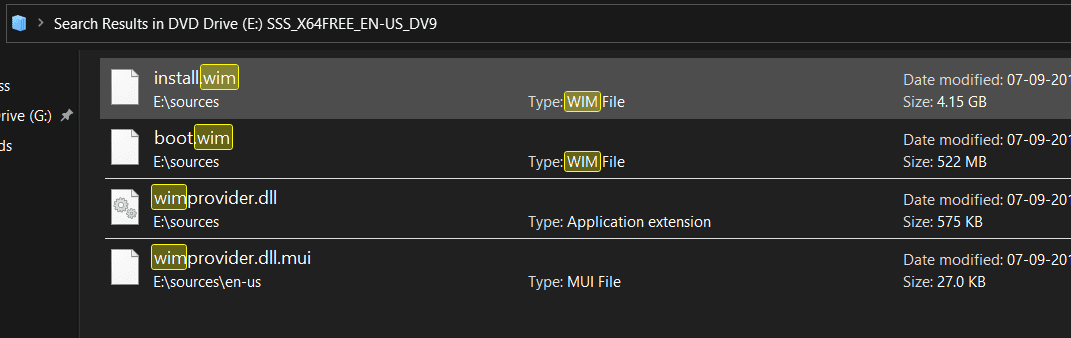
Mount the ISO -> copy all the files to a directory, select install.wim
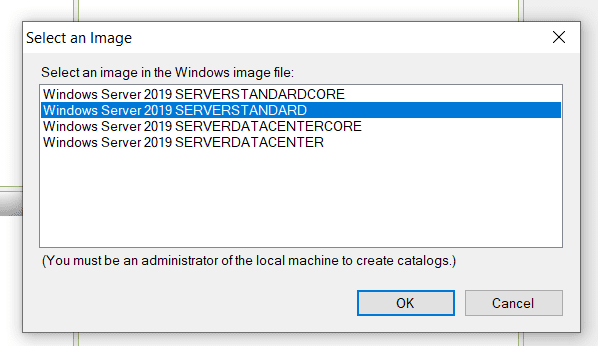
- Select the OS image name/type

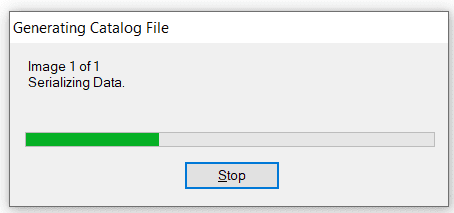
- Create a catalog file
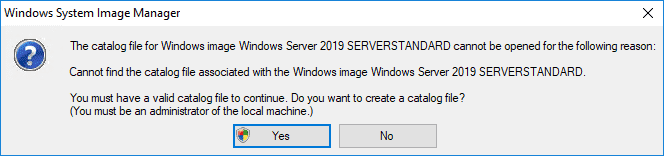
Note: If you don’t see the above message and it’s spitting out errors.
- Try installing a different version of ADK. (Windows 10, version 1809 worked for me)
- Even after that if you’re getting errors like:
This application requires version 6.3.9600.16384 of the Windows ADK. Install this version to correct the problem. Try copying thatinstall.wimfile to another location.
Now, let’s suppose, I want to add some configuration related to Internet Explorer. I can just Right-Click and add to specific pass.
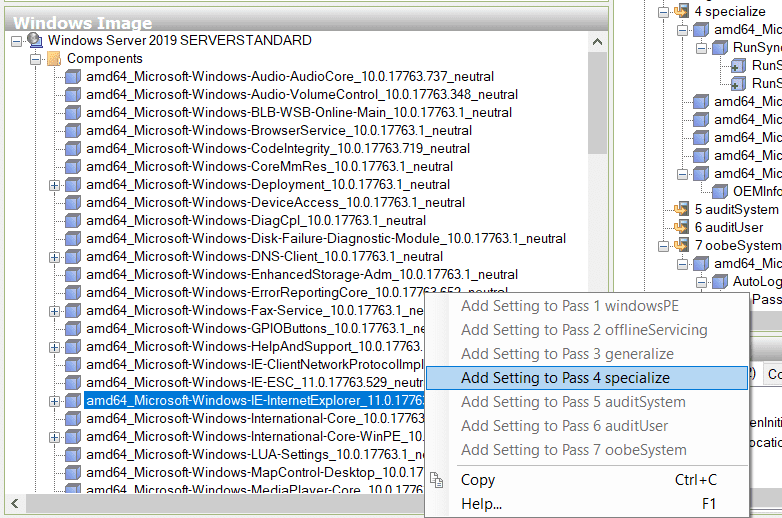
Each component has a lot of properties which you can configure, like IE has: 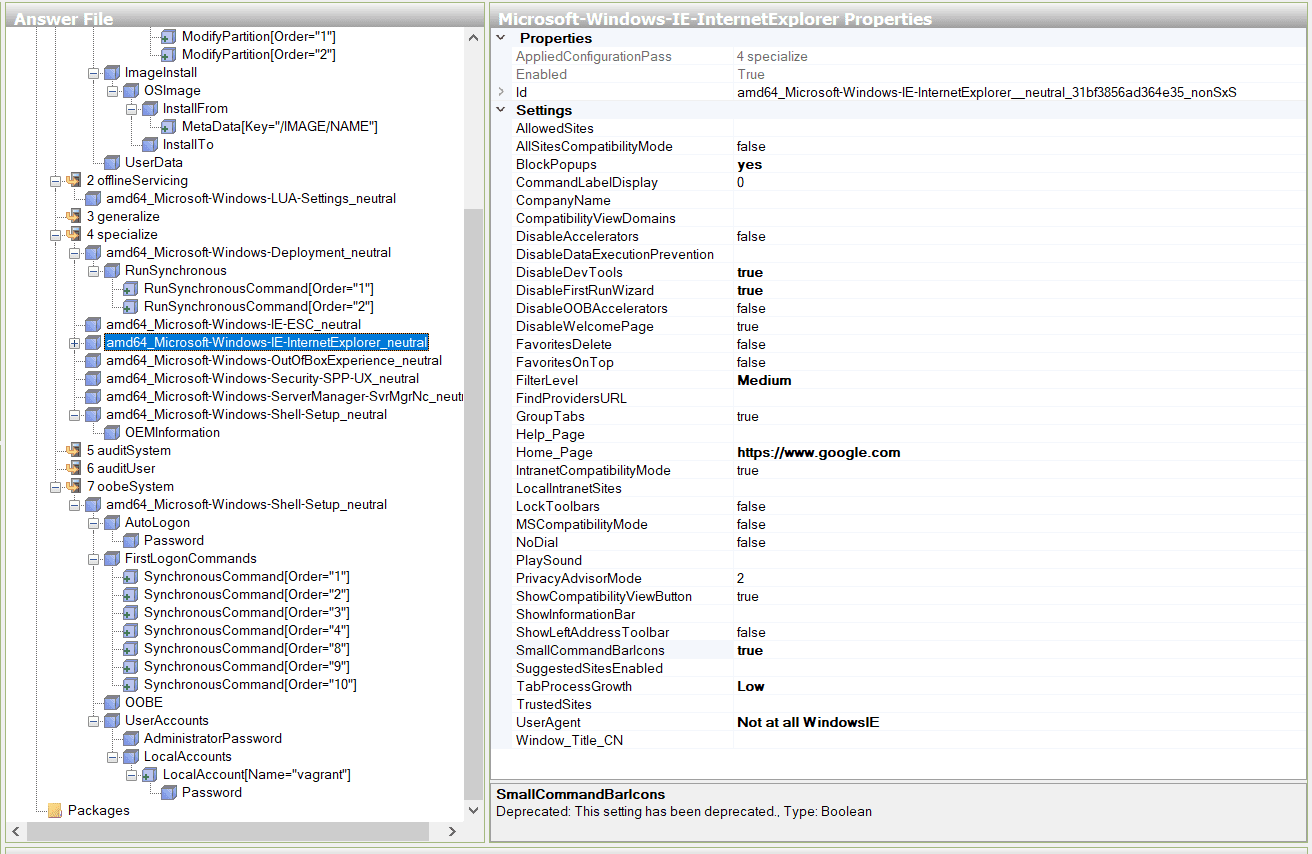
I’ve made some changes so that:
- Popups are blocked
- DevTools is disabled
- No frustrating first run wizard
- Homepage is Google and I’m not slammed with some MSN news
- A Custom User-Agent
Do all you want and then export the answer file as autounattend.xml ;)
TL;DR Build the lab?
I’ve given the installation steps in my git repo, I’ll show what really happens when you run those commands.
- Download the ISO files in the main(Auror-Project) directory
Build ISO using packer with
packer build server-2019.json&packer build win10.jsonor
even better you can run
.\packer-build.batto run both the packer builds at the same time.(On windows ofc, for Linux you can usenohup <cmd> &) which contains:1 2
start cmd /K "cd Packer\server-2019 && packer build server-2019.json" start cmd /K "cd Packer\win10 && packer build win10.json"
Output:
Build will take sometime and should look like this:
My build finished in ~20 mins. - Now, We’ve to configure the built base images with vagrant to build our environment.
1
cd Vagrant && vagrant up
My Vagrant took 38 minutes to set up the environment. Taking it as ~40 mins.
 My build finished in ~20 mins.
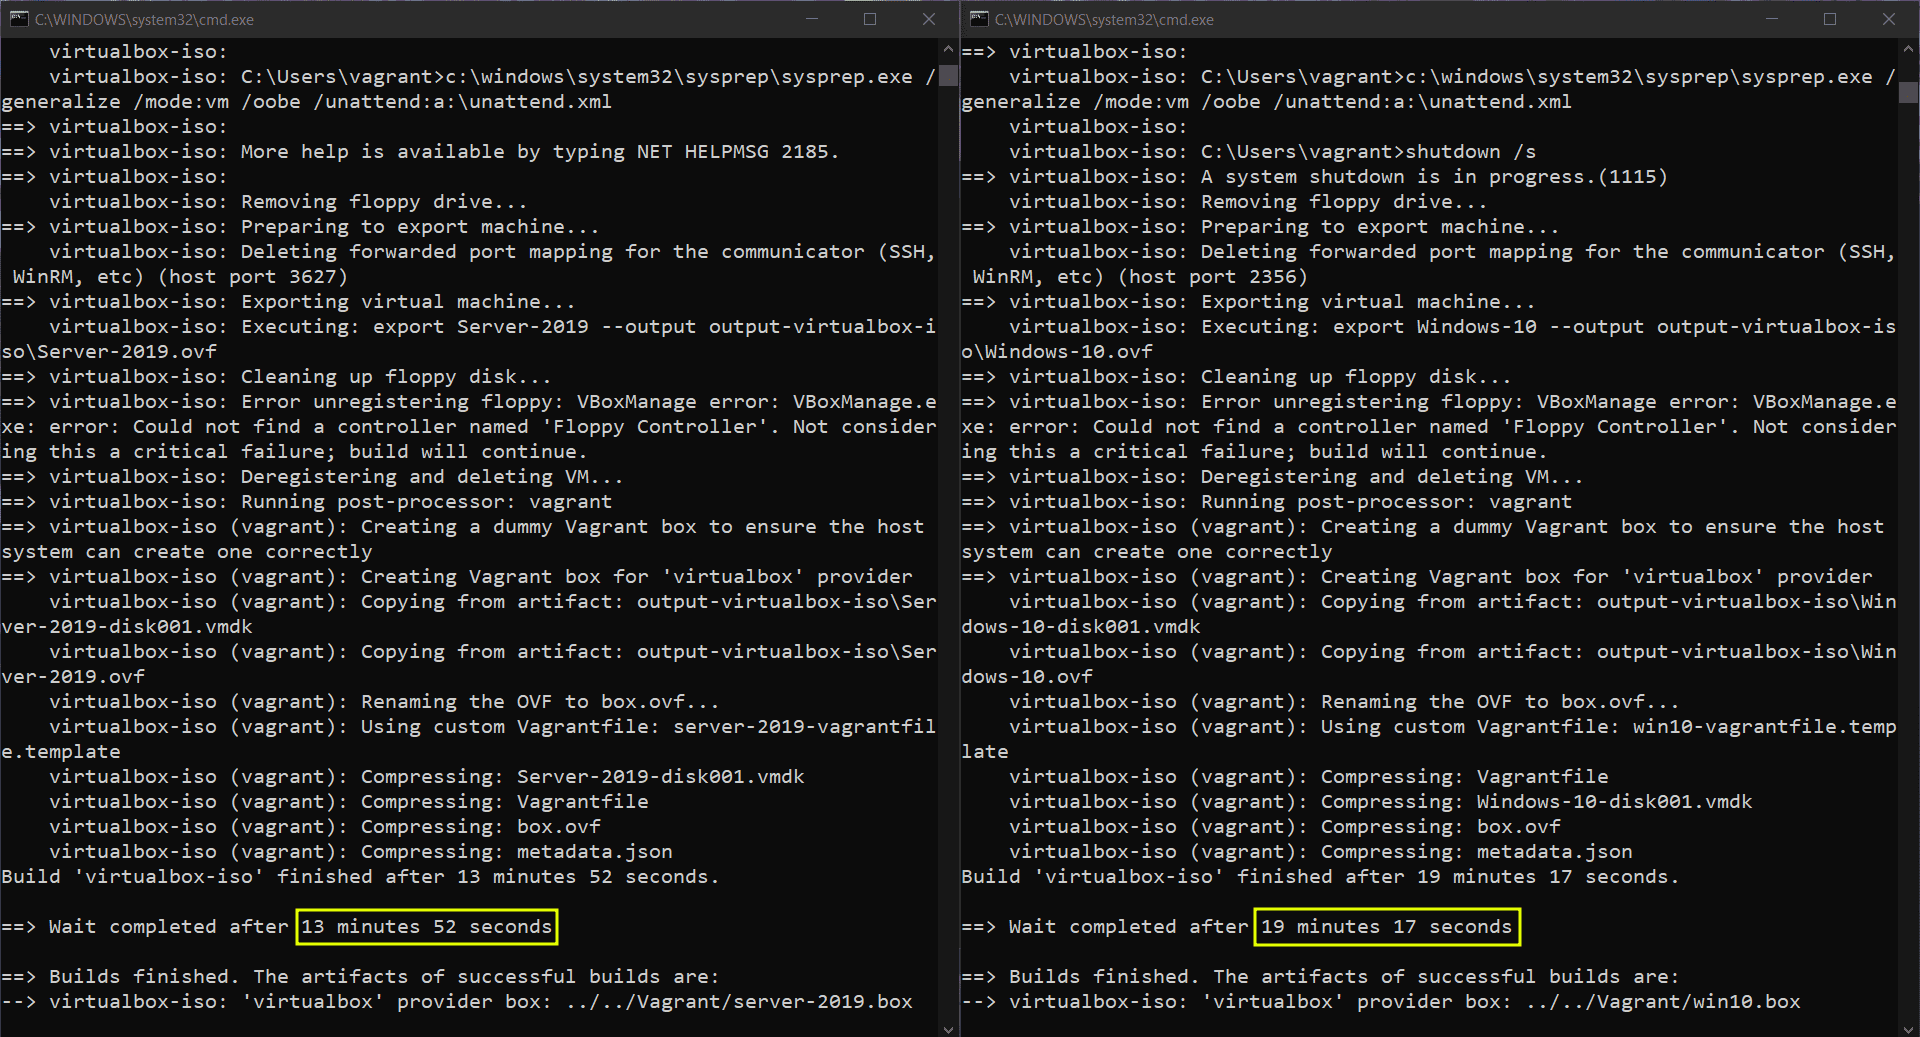
There it is.. Complete lab from scratch in your fingertips within 60 mins.
Under the hood (Build)
Building Server-2019 with Packer
- Retrieves ISO and tries to fetch it from the given location
- Creates a floppy disk, copies all the floppy files
- Creates a VM with the given size
- Mounts ISO, mounts and attaches floppy disk
- Creates forwarded port mapping for communicators like SSH and WinRM with the given credentials
- Executes VBoxManage commands for Memory and CPU config
- Starts VM, waits for boot and tries to connect to the installation using communicator (WinRM)
- Installation using the autounattend.xml carries on
- After the installation completes, shutdown command is triggered, which initializes SysPrep
- Deletes forwarded mapping for communicators
- Exports VM in .ovf format and deletes VM
- Runs Post processor vagrant which takes the .ovf artifact and outputs a Vagrant .box using the template provided
1
2
3
4
5
6
7
8
9
10
11
12
13
14
15
16
17
18
19
20
21
22
23
24
25
26
27
28
29
30
31
32
33
34
35
36
37
38
39
40
41
42
43
44
45
46
47
48
49
50
51
52
53
54
55
56
57
58
59
60
61
62
63
64
65
66
67
68
69
70
71
72
73
74
75
76
77
78
79
80
'Command: packer build server-2019.json'
virtualbox-iso: output will be in this color.

==> virtualbox-iso: Retrieving ISO
==> virtualbox-iso: Trying ../../WinSrv_2019_17763.737.190906-2324.rs5_release_svc_refresh_SERVER_EVAL_x64FRE_en-us_1.iso
==> virtualbox-iso: Trying ../../WinSrv_2019_17763.737.190906-2324.rs5_release_svc_refresh_SERVER_EVAL_x64FRE_en-us_1.iso?checksum=sha256%3A549bca46c055157291be6c22a3aaaed8330e78ef4382c99ee82c896426a1cee1
==> virtualbox-iso: ../../WinSrv_2019_17763.737.190906-2324.rs5_release_svc_refresh_SERVER_EVAL_x64FRE_en-us_1.iso?checksum=sha256%3A549bca46c055157291be6c22a3aaaed8330e78ef4382c99ee82c896426a1cee1 => D:/Shared/Auror-Project/WinSrv_2019_17763.737.190906-2324.rs5_release_svc_refresh_SERVER_EVAL_x64FRE_en-us_1.iso
==> virtualbox-iso: Creating floppy disk...
    virtualbox-iso: Copying files flatly from floppy_files
    virtualbox-iso: Copying file: files/autounattend.xml
    virtualbox-iso: Copying file: files/unattend.xml
    virtualbox-iso: Copying file: files/scripts/fixnetwork.ps1
    virtualbox-iso: Copying file: files/scripts/sysprep.bat
    virtualbox-iso: Copying file: files/scripts/winrmConfig.bat
    virtualbox-iso: Done copying files from floppy_files
    virtualbox-iso: Collecting paths from floppy_dirs
    virtualbox-iso: Resulting paths from floppy_dirs : []
    virtualbox-iso: Done copying paths from floppy_dirs
    virtualbox-iso: Copying files from floppy_content
    virtualbox-iso: Done copying files from floppy_content
==> virtualbox-iso: Creating ephemeral key pair for SSH communicator...
==> virtualbox-iso: Created ephemeral SSH key pair for communicator
==> virtualbox-iso: Creating virtual machine...
==> virtualbox-iso: Creating hard drive output-virtualbox-iso\Server-2019.vdi with size 40960 MiB...
==> virtualbox-iso: Mounting ISOs...
    virtualbox-iso: Mounting boot ISO...
==> virtualbox-iso: Deleting any current floppy disk...
==> virtualbox-iso: Attaching floppy disk...
==> virtualbox-iso: Creating forwarded port mapping for communicator (SSH, WinRM, etc) (host port 2305)
==> virtualbox-iso: Executing custom VBoxManage commands...
    virtualbox-iso: Executing: modifyvm Server-2019 --memory 2048
    virtualbox-iso: Executing: modifyvm Server-2019 --cpus 2
==> virtualbox-iso: Starting the virtual machine...
    virtualbox-iso: The VM will be run headless, without a GUI. If you want to
    virtualbox-iso: view the screen of the VM, connect via VRDP without a password to
    virtualbox-iso: rdp://127.0.0.1:5922
==> virtualbox-iso: Waiting 5m0s for boot...
==> virtualbox-iso: Typing the boot command...
==> virtualbox-iso: Using WinRM communicator to connect: 127.0.0.1
==> virtualbox-iso: Waiting for WinRM to become available...
    virtualbox-iso: WinRM connected.
==> virtualbox-iso: Connected to WinRM!
==> virtualbox-iso: Uploading VirtualBox version info (6.1.34)
==> virtualbox-iso: Gracefully halting virtual machine...
    virtualbox-iso:
==> virtualbox-iso: The service name is invalid.
    virtualbox-iso: C:\Users\vagrant>net stop tiledatamodelsvc
==> virtualbox-iso:
==> virtualbox-iso: More help is available by typing NET HELPMSG 2185.
    virtualbox-iso:
==> virtualbox-iso:
    virtualbox-iso: C:\Users\vagrant>c:\windows\system32\sysprep\sysprep.exe /generalize /mode:vm /oobe /unattend:a:\unattend.xml
    virtualbox-iso:
    virtualbox-iso: C:\Users\vagrant>shutdown /s
==> virtualbox-iso: A system shutdown is in progress.(1115)
    virtualbox-iso: Removing floppy drive...
==> virtualbox-iso: Preparing to export machine...
    virtualbox-iso: Deleting forwarded port mapping for the communicator (SSH, WinRM, etc) (host port 2305)
==> virtualbox-iso: Exporting virtual machine...
    virtualbox-iso: Executing: export Server-2019 --output output-virtualbox-iso\Server-2019.ovf
==> virtualbox-iso: Cleaning up floppy disk...
==> virtualbox-iso: Error unregistering floppy: VBoxManage error: VBoxManage.exe: error: Could not find a controller named 'Floppy Controller'. Not considering this a critical failure; build will continue.
==> virtualbox-iso: Deregistering and deleting VM...
==> virtualbox-iso: Running post-processor: vagrant
==> virtualbox-iso (vagrant): Creating a dummy Vagrant box to ensure the host system can create one correctly
==> virtualbox-iso (vagrant): Creating Vagrant box for 'virtualbox' provider
    virtualbox-iso (vagrant): Copying from artifact: output-virtualbox-iso\Server-2019-disk001.vmdk
    virtualbox-iso (vagrant): Copying from artifact: output-virtualbox-iso\Server-2019.ovf
    virtualbox-iso (vagrant): Renaming the OVF to box.ovf...
    virtualbox-iso (vagrant): Using custom Vagrantfile: server-2019-vagrantfile.template
    virtualbox-iso (vagrant): Compressing: Server-2019-disk001.vmdk
    virtualbox-iso (vagrant): Compressing: Vagrantfile
    virtualbox-iso (vagrant): Compressing: box.ovf
    virtualbox-iso (vagrant): Compressing: metadata.json
Build 'virtualbox-iso' finished after 13 minutes 52 seconds.

==> Wait completed after 13 minutes 52 seconds

==> Builds finished. The artifacts of successful builds are:
--> virtualbox-iso: 'virtualbox' provider box: ../../Vagrant/server-2019.box
Building Windows-10 with Packer
Every step is the same as server-2019 except here we also provided provisioners which are setup.ps1 and cleanup.ps1, they run after builders and before SysPrep happens.(So, At Step 9 provisioners run now)
Setting up the environment using Vagrant
- Brings up dc01 and pc01 VMs and prepares the base image for the clone by importing .box files
- Clones VM, sets up name, network configuration and forwards required ports for communication like RDP, WinRM and SSH
- Boots VM and waits to connect to a communicator
- Tries to find Guest additions (because I’ve shared clipboard and VRAM set in vagrantfile) and if not, installs guest additions and Set the required VM configuration
- Mounts the current directory to run provisioners which are
set-timezone.ps1, theninstall-active-directory.ps1(which installs ADDS, then performs DCPromo) andadd-adam.ps1for DC01
Same steps for PC01, except the provisioner scripts here are different.
install-chrome.ps1 installs Google chrome, then join-domain.ps1 joins PC01 to auror.local domain and add-localadmin.ps1 makes Adam a localadmin for PC01.
1
2
3
4
5
6
7
8
9
10
11
12
13
14
15
16
17
18
19
20
21
22
23
24
25
26
27
28
29
30
31
32
33
34
35
36
37
38
39
40
41
42
43
44
45
46
47
48
49
50
51
52
53
54
55
56
57
58
59
60
61
62
63
64
65
66
67
68
69
70
71
72
73
74
75
76
77
78
79
80
81
82
83
84
85
86
87
88
89
90
91
92
93
94
95
96
97
98
99
100
101
102
103
104
105
106
107
108
109
110
111
112
113
114
115
116
117
118
119
120
121
122
123
124
125
126
127
128
129
130
131
132
133
134
135
136
137
138
139
140
141
142
143
144
145
146
147
148
149
150
151
152
153
154
155
156
157
158
159
160
161
162
163
164
165
166
167
168
169
170
171
172
173
174
175
176
177
178
179
180
181
182
183
184
185
186
187
188
189
190
191
192
193
194
195
196
197
198
199
200
201
202
203
204
205
206
207
208
209
210
211
212
213
214
215
216
217
218
219
220
221
222
223
224
225
226
227
228
229
230
231
232
233
234
235
236
237
238
239
240
241
242
243
244
245
246
247
248
D:\Shared\Auror-Project>cd vagrant && vagrant up
Bringing machine 'dc01' up with 'virtualbox' provider...
Bringing machine 'pc01' up with 'virtualbox' provider...
==> dc01: Preparing master VM for linked clones...
    dc01: This is a one time operation. Once the master VM is prepared,
    dc01: it will be used as a base for linked clones, making the creation
    dc01: of new VMs take milliseconds on a modern system.
==> dc01: Importing base box 'server-2019.box'...
==> dc01: Cloning VM...
==> dc01: Matching MAC address for NAT networking...
==> dc01: Setting the name of the VM: DC01
==> dc01: Clearing any previously set network interfaces...
==> dc01: Preparing network interfaces based on configuration...
    dc01: Adapter 1: nat
    dc01: Adapter 2: hostonly
==> dc01: Forwarding ports...
    dc01: 3389 (guest) => 3389 (host) (adapter 1)
    dc01: 5985 (guest) => 55985 (host) (adapter 1)
    dc01: 5986 (guest) => 55986 (host) (adapter 1)
    dc01: 22 (guest) => 2222 (host) (adapter 1)
==> dc01: Running 'pre-boot' VM customizations...
==> dc01: Booting VM...
==> dc01: Waiting for machine to boot. This may take a few minutes...
    dc01: WinRM address: 127.0.0.1:55985
    dc01: WinRM username: vagrant
    dc01: WinRM execution_time_limit: PT2H
    dc01: WinRM transport: plaintext
==> dc01: Machine booted and ready!
[dc01] No Virtualbox Guest Additions installation found.
Copy iso file C:\Program Files\Oracle\VirtualBox\VBoxGuestAdditions.iso into the box $env:TEMP/VBoxGuestAdditions.iso


Attached          : True
BlockSize         : 0
DevicePath        : \\.\CDROM0
FileSize          : 61538304
ImagePath         : C:\Users\vagrant\AppData\Local\Temp/VBoxGuestAdditions.iso
LogicalSectorSize : 2048
Number            : 0
Size              : 61538304
StorageType       : 1
PSComputerName    :


Mounting Virtualbox Guest Additions ISO to: D
Installing Virtualbox Guest Additions 6.1.34 - guest version is unknown
VBoxCertUtil.exe: info: Successfully added 'vbox-sha1.cer' as trusted publisher
VBoxCertUtil.exe: info: Successfully added 'vbox-sha256.cer' as trusted publisher
VBoxCertUtil.exe: info: Successfully added 'vbox-sha1.cer' as root
VBoxCertUtil.exe: info: Successfully added 'vbox-sha256.cer' as root
Unmounting Virtualbox Guest Additions ISO from: D


Attached          : False
BlockSize         : 0
DevicePath        :
FileSize          : 61538304
ImagePath         : C:\Users\vagrant\AppData\Local\Temp/VBoxGuestAdditions.iso
LogicalSectorSize : 2048
Number            :
Size              : 61538304
StorageType       : 1
PSComputerName    :


==> dc01: Checking for guest additions in VM...
==> dc01: Setting hostname...
==> dc01: Waiting for machine to reboot...
==> dc01: Configuring and enabling network interfaces...
==> dc01: Mounting shared folders...
    dc01: /vagrant => D:/Shared/Auror-Project/Vagrant
==> dc01: Running provisioner: shell...
    dc01: Running: ./files/set-timezone.ps1 as C:\tmp\vagrant-shell.ps1
==> dc01: Running provisioner: shell...
==> dc01: Waiting for machine to reboot...
==> dc01: Running provisioner: shell...
    dc01: Running: ./files/install-active-directory.ps1 as C:\tmp\vagrant-shell.ps1
    dc01: Removing default password complexity policy...
    dc01:
    dc01: The task has completed successfully.
    dc01: See log %windir%\security\logs\scesrv.log for detail info.
Completed 100 percent (18/18) (0Process Security Policy area
    dc01: The task has completed successfully.
    dc01: See log %windir%\security\logs\scesrv.log for detail info.
    dc01: Setting DNS server addresses. . .
    dc01: Installing Active Directory features. . .
    dc01:
    dc01: Success Restart Needed Exit Code      Feature Result
    dc01: ------- -------------- ---------      --------------
    dc01: True    No             Success        {Active Directory Domain Services, Remote ...
    dc01: Creating Active Directory forest. . .
    dc01: WARNING: Windows Server 2019 domain controllers have a default for the security setting named "Allow cryptography
    dc01: algorithms compatible with Windows NT 4.0" that prevents weaker cryptography algorithms when establishing security
    dc01: channel sessions.
    dc01:
    dc01: For more information about this setting, see Knowledge Base article 942564
    dc01: (http://go.microsoft.com/fwlink/?LinkId=104751).
    dc01:
    dc01: WARNING: This computer has at least one physical network adapter that does not have static IP address(es) assigned to
    dc01: its IP Properties. If both IPv4 and IPv6 are enabled for a network adapter, both IPv4 and IPv6 static IP addresses
    dc01: should be assigned to both IPv4 and IPv6 Properties of the physical network adapter. Such static IP address(es)
    dc01: assignment should be done to all the physical network adapters for reliable Domain Name System (DNS) operation.
    dc01:
    dc01: WARNING: A delegation for this DNS server cannot be created because the authoritative parent zone cannot be found or it
    dc01:  does not run Windows DNS server. If you are integrating with an existing DNS infrastructure, you should manually
    dc01: create a delegation to this DNS server in the parent zone to ensure reliable name resolution from outside the domain
    dc01: "auror.local". Otherwise, no action is required.
    dc01:
    dc01:
    dc01: Message        : You must restart this computer to complete the operation.
    dc01:
    dc01: Context        : DCPromo.General.2
    dc01: RebootRequired : True
    dc01: Status         : Success
    dc01:
    dc01:
    dc01:
==> dc01: Running provisioner: shell...
==> dc01: Waiting for machine to reboot...
==> dc01: Running provisioner: shell...
    dc01: Running: ./files/add-adam.ps1 as C:\tmp\vagrant-shell.ps1
    dc01: The command completed successfully.
    dc01:
==> dc01: Running provisioner: shell...
==> dc01: Waiting for machine to reboot...
==> pc01: Preparing master VM for linked clones...
    pc01: This is a one time operation. Once the master VM is prepared,
    pc01: it will be used as a base for linked clones, making the creation
    pc01: of new VMs take milliseconds on a modern system.
==> pc01: Importing base box 'win10.box'...
==> pc01: Cloning VM...
==> pc01: Matching MAC address for NAT networking...
==> pc01: Setting the name of the VM: PC01
==> pc01: Fixed port collision for 3389 => 3389. Now on port 2200.
==> pc01: Fixed port collision for 5985 => 55985. Now on port 2201.
==> pc01: Fixed port collision for 5986 => 55986. Now on port 2202.
==> pc01: Fixed port collision for 22 => 2222. Now on port 2203.
==> pc01: Clearing any previously set network interfaces...
==> pc01: Preparing network interfaces based on configuration...
    pc01: Adapter 1: nat
    pc01: Adapter 2: hostonly
==> pc01: Forwarding ports...
    pc01: 3389 (guest) => 2200 (host) (adapter 1)
    pc01: 5985 (guest) => 2201 (host) (adapter 1)
    pc01: 5986 (guest) => 2202 (host) (adapter 1)
    pc01: 22 (guest) => 2203 (host) (adapter 1)
==> pc01: Running 'pre-boot' VM customizations...
==> pc01: Booting VM...
==> pc01: Waiting for machine to boot. This may take a few minutes...
    pc01: WinRM address: 127.0.0.1:2201
    pc01: WinRM username: vagrant
    pc01: WinRM execution_time_limit: PT2H
    pc01: WinRM transport: plaintext
==> pc01: Machine booted and ready!
[pc01] No Virtualbox Guest Additions installation found.
Copy iso file C:\Program Files\Oracle\VirtualBox\VBoxGuestAdditions.iso into the box $env:TEMP/VBoxGuestAdditions.iso


Attached          : True
BlockSize         : 0
DevicePath        : \\.\CDROM0
FileSize          : 61538304
ImagePath         : C:\Users\vagrant\AppData\Local\Temp/VBoxGuestAdditions.iso
LogicalSectorSize : 2048
Number            : 0
Size              : 61538304
StorageType       : 1
PSComputerName    :


Mounting Virtualbox Guest Additions ISO to: D
Installing Virtualbox Guest Additions 6.1.34 - guest version is unknown
VBoxCertUtil.exe: info: Successfully added 'vbox-sha1.cer' as trusted publisher
VBoxCertUtil.exe: info: Successfully added 'vbox-sha256.cer' as trusted publisher
VBoxCertUtil.exe: info: Successfully added 'vbox-sha1.cer' as root
VBoxCertUtil.exe: info: Successfully added 'vbox-sha256.cer' as root
Unmounting Virtualbox Guest Additions ISO from: D


Attached          : False
BlockSize         : 0
DevicePath        :
FileSize          : 61538304
ImagePath         : C:\Users\vagrant\AppData\Local\Temp/VBoxGuestAdditions.iso
LogicalSectorSize : 2048
Number            :
Size              : 61538304
StorageType       : 1
PSComputerName    :


==> pc01: Checking for guest additions in VM...
==> pc01: Setting hostname...
==> pc01: Waiting for machine to reboot...
==> pc01: Configuring and enabling network interfaces...
==> pc01: Mounting shared folders...
    pc01: /vagrant => D:/Shared/Auror-Project/Vagrant
==> pc01: Running provisioner: shell...
    pc01: Running: ./files/install-chrome.ps1 as C:\tmp\vagrant-shell.ps1
    pc01: Still running: ChromeInstaller
    pc01: Still running: ChromeInstaller
    pc01: Still running: ChromeInstaller
    pc01: Still running: ChromeInstaller
    pc01: Still running: ChromeInstaller
    pc01: Still running: ChromeInstaller
    pc01: Still running: ChromeInstaller
    pc01: Still running: ChromeInstaller
    pc01: Still running: ChromeInstaller
    pc01: Still running: ChromeInstaller
    pc01: Still running: ChromeInstaller
    pc01: Still running: ChromeInstaller
    pc01: VERBOSE: Performing the operation "Remove File" on target "C:\Users\vagrant\AppData\Local\Temp\ChromeInstaller.exe".
    pc01: Ok.
    pc01:
==> pc01: Running provisioner: shell...
==> pc01: Waiting for machine to reboot...
==> pc01: Running provisioner: shell...
    pc01: Running: ./files/join-domain.ps1 as C:\tmp\vagrant-shell.ps1
    pc01: Setting DNS server addresses. . .
    pc01: Joining Active Directory domain. . .
    pc01: WARNING: The changes will take effect after you restart the computer PC01.
==> pc01: Running provisioner: shell...
==> pc01: Waiting for machine to reboot...
==> pc01: Running provisioner: shell...
    pc01: Running: ./files/add-localadmin.ps1 as C:\tmp\vagrant-shell.ps1
==> pc01: Running provisioner: shell...
==> pc01: Waiting for machine to reboot...
That’s all for the first task. I’ll post more from The Auror Project in the upcoming blogs.
Thanks for giving a visit!